
Blog
The Quest for a Leak-Proof Roof
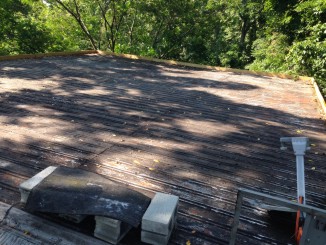
The project for 2014 was to get a roof on the garage that didn't leak and was insulated sufficiently. The building has a single, long sloping corrugated steel roof which is just under 1,200 square feet, so it is a large surface. Plus it is a flat roof, which drops just 1 foot over a 30 foot length. According to the Interwebs, minimum pitch for a roof is a quarter inch per foot. That translates to 1:48 and ours is 1:30, so it's really pretty flat.
Both the houses we've owned since Danielle and I have been married had flat roofs and both of them leaked. The office for A Childs Eyes has a tiny roof in the back and it leaks. I've tried to fix them over and over and they all still leak, despite my best efforts.
I despise flat roofs.
Honestly, the only way to fix a leak in a flat roof really is to reroof the entire thing. You have no way of knowing where the leak originates and how far it may have travelled horizontally before it starts travelling vertically. All you know is that the leak originates somewhere higher than where it shows up in the house.
As I mentioned in the last blog about redoing the drainage at the foundation, when we bought the house, the previous owner put a large piece of surplus rubber on the garage roof over top of a couple pieces of thick non-woven fabric. But since the rubber wasn't glued down, it eventually started to tear when the wind got under it. Now, after 14 years, the rubber was pretty much shredded into ribbons all over the roof and provided no rain coverage at all.
So I was resigned to learning how to put on a rubber roof. I watched a bunch of videos online and thought that probably we could do it. Standard practice is to put down a layer of foam board insulation and use these huge screws and washers to screw the boards down. Then you spread glue all over the top of the foamboard and on the back side of the rubber and slowly roll it out, seaming the edges and flashing the sides. Not impossible, but I'd never done it before. Of course, most everything I try, I've never done before. Some things I try, nobody's ever done before!
I found a rubber supplier in Shippensburg who could provide the rubber for the roof in two large pieces, 18 x 32, so I'd only have to do one seam in the middle, rather than the 10 foot rolls you can get from Home Depot, which would cause me to have to do 3 seams. The rubber, flashing and glue was $2,100. It would also take 48 4 by 8 sheets of foamboard to cover the roof, another $1,500. Screws, washers and tools, perhaps $200, so the total would be around $3,800.
That's a lot of money to spend to do something you've never done before.
Also, two inches of foamboard only provides an R-Factor of 10, and virtually no soundproofing. York county is officially in Climate Zone 4, one of only 3 counties in Pennsylvania, requires R-38 in the ceiling, so R-10 is not even close! Six inches of insulation in the rafters would get us to R-40 and would be about another $600.
So, grand total was $4,400 to do a job that, if it isn't done right, would leak anyway and may even have to be done again in a decade. Hmm.
One day, as I was searching around the internet for videos to watch about roofing, a result for something called a foam roof came up because the site mentioned rubber roofing in it. The mysterious ways of Googling. I clicked on it and found that there is a technology that apparently has been around forever which sprays a two-part heated liquid plastic mixture onto the roof surface. It chemically interacts and forms an impervious, water-tight foam. It's like a gigantic can of Great Stuff! being sprayed on your roof.
Not many places do this sort of thing, apparently, and certainly nobody very local. It definitely is not equipment you can rent and just do yourself. The foam expands over 100 times when it's mixed together, so it's not something you want to get in your lungs! I found a place called iFoam near Lancaster and James Townsley gave me a price of $5,900 to do the main roof 5 inches deep and fill up all the rafter ends inside the building over top of the block wall with another 5 inches. They said it would take about a day to cover the roof with foam and finish it off with two layers of a polymeric coating. It would have taken quite a long time to do the rubber work ourselves, weeks I'm sure, so even though it was $1,500 more, it seemed like a much better idea to have the professional do the work this time.
Plus it would cover and insulate at the same time. James said that there are foam roofs 50 years old that still don't leak. Provided that you recoat the roof every 5 years or so, they don't really know when they fail, because none of them ever have. That's pretty impressive, I think.
I wanted to put a sort of a retaining wall around the roof edge even though James said he could put the foam on the roof even without a border because the the stuff was sticky like crazy. So in April 2014 we started taking all the rest of the loose pieces of rubber off the roof and preparing the surface.
Except right away there was a problem, because there were about a hundred bee's nests in the wood above the door opening and in the roof line all the way around the building. Seriously, there were so many bee's nests that the bees were fighting each other, big lazy bee battles with bees from different nests continuously swooping around each other.
Now I don't mind bees, because if you leave them alone, they leave you alone (It's true, Danielle). But if you're killing their nest, sitting on a scaffolding ten feet in the air, well, that might set them off. So for a month I waged a continuously escalating war on them. First I tried spraying them, and then spraying right into their holes. Eventually I would come home after work at midnight and spray them right in their holes then cover the holes up with duck tape. In the morning I would come out and they would be slowly chewing a perfectly round hole through the duck tape, so I would spray them right in their little bee faces. It was horrible. Oh the bee-manity!
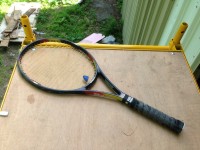
Eventually, I hit upon the final solution. Just sitting there on top of the scaffolding and using a tennis racket to knock them out of the sky. Eventually after about 50 dollars of insecticide and weeks of hand-to-feeler combat, in mid-June we were able to start putting the lumber up around the edge of the roof.
The soffit had to stand above the roof five inches so that means it would be about 14 inches from the bottom of the rafter to the top of board. Naturally, the metal roof stuck out farther than the edges of the rafters, so it needed to be cut flush with the rafter end. I took a circular saw with a metal cutting blade to cut back both the roof and corrugated steel. A loud, screaming, hot, metal bits flying job all in itself!
After that, to get to the required fourteen inches in height, we had to rip down two-by pressure-treated lumber into three-inch wide lengths, glue and screw them to the bottom of the end of each rafter and then set these huge 2 by 12's onto them, working our way around the perimeter of the roof. It was always a scary moment dropping the boards out over the edge of the roof onto the 3-inch cleats. One time it slipped off and almost knocked me off the scaffolding! 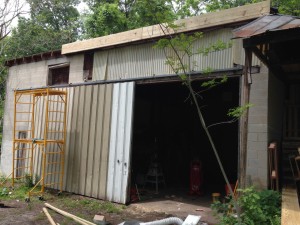 We would attach the board to the roof using hurricane ties and glue and screw them in with five 3-inch decking screws into the end of each rafter. It was very gratifying to see how sturdy it became each time we were finished attaching each piece.
We finished off the underside of the eaves with another pressure treated two-by, but I learned my lesson this time. We planed the boards down a good bit to make them lighter to handle. If would have been impossible to hold them up and screw them in under the overhang 16 feet in the air. So we rigged up a jig to plane them at an angle so that they were 3/4 of an inch at one end and the full 1 1/2 inches at the other. They look pretty nice, I think. Later in the year, we bought a power planer to plane down the spots where the two boards butted together unevenly, and then foamed and caulked the gaps.
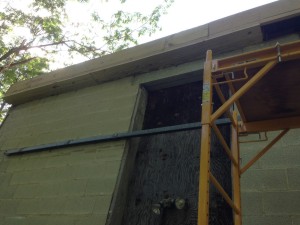
On the west side of the garage (the side parallel to the rafters), we had another really big problem because of the way the previous owner originally built the roof onto the walls. He simply laid the rafters out onto the cement block and wherever the last rafter was placed, that's where it ended up. It so happened that the last one was about 9 inches from the outside edge of the wall, not even over top of the block wall! So, there was no rim joist parallel to the edge of the roof: he just jury-rigged an edge to attach some pieces of aluminum onto it as a drip-edge. In other words, there was no edge to the roof and no place to attach the perimeter board that we wanted to run. In fact in most places on that side, the only thing keeping the weather out was a thin piece of aluminum! There was no practical way to insulate or attach a board or anything.
Finally, since it was the also the side of the roof which sloped, it was a foot higher at one end and we needed to follow that angle to keep the soffit a continuous 5 inches the whole way around. To complicate things even more, there were also two concrete block headers over the windows at the top of the wall that obviously had to stay, even though they would be in the way of the soffit.
After much head scratching, the idea I eventually came up with was to just cut the roof back an inch from the edge of the wall, brace the edge underneath on the top of the concrete block wall there and simply attach the soffit board right to the corrugated roof with more hurricane ties. I would just let it hang above the block wall and screw it from the side into each of the supports. Then later we attached some metal lath to the bracing and filled in the gap between the new soffit and the concrete block with stucco/mortar mix. 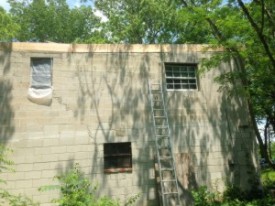 We also had to cut down one edge of one window header at an angle with a concrete cutting blade so the soffit was at the right angle, which ended up probably being the worst part of the job.
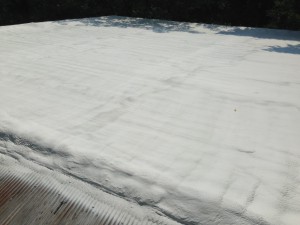
We scheduled to have to roof foamed in July before our vacation, but between the Battle of the Bee and having to basically rebuild the west end of the garage roof, we only managed to get the perimeter board done in mid-September. iFoam came and foamed the roof on September 18th.
I do have to say that originally the foam was not nearly deep enough and I was pretty disappointed. I actually drilled a hole in the foam at the exact center of the roof and measured down to the metal and it was only 1 3/4 inches deep, a far cry from the 5 inches I paid for. But, to his credit, when I called James he immediately said he would come out and refoam the entire roof until I was satisfied. He told me he had already used an entire drum of the foaming agent on the roof and he couldn't understand why it didn't foam up right.
He came back out in October and foamed the roof up to spec without any problem. So we went from R-0 to R35 in the course of two afternoons. James also put an inch on the shed roof just to keep the water out. He gets five stars from me because of his customer service.
 Before the roof was foamed, we still had 4 or 5 places in the garage that leaked during hard rains, but all the leaks in the building stopped right away (except for one). So I have come to understand that leaks in the foundation may very well occur because there are leaks in the roof. Especially since our building is a hollow block wall, the hollows inside the block provide dozens of conduits to guide the water down to the foundation, where it will come out in the building.
After this experience, my advice is fix the roof first, then see about the foundation.
As of today, the last leak is still not fixed, unfortunately. It is in the part of the building where the foundation is totally above ground level, so it is not coming in there. I completely caulked and sealed that entire corner, but you can still see the water dripping down the inside of the wall during rain storms and when snow melts off the roof. Finally, in December, we even dragged one of the pieces of rubber back up on the roof and draped it around that corner. Still leaked. Did I mention I hate flat roofs?
The only thing I can figure now is that the rain is literally coming right through the wall. When I was redoing the foundation in 2013, I did happen to notice that the previous owner had actually drilled a drain hole in the corner inside, so it is pretty clear that the water has been draining down on the inside of this building for most of 40 years. I didn't know it was a drain hole at the time, so I filled it in, which only made the problem worse. Of course, a drain hole is a pretty bad solution anyway.
So this spring I will be painting the entire back of the garage outside with Drylok after etching the block with muriatic acid to remove the efflorescence. Then we'll see about a French drain if necessary.
Next blog I will be talking about how we are insulating and soundproofing the inside of the walls. The R-factor of a hollow block wall is somewere between R2 and R3. Walls for Zone 4 should be R21, so we need to do way better than that. Plus we need a large mass for effective soundproofing. What we are doing is something that even Google has never heard of! So stay tuned for the next blog!